Saturday 29 April 2017

Show user a different location and send it to another

Many people have a habit to check the link before going on it.How they check it? Yes! by keeping mouse on it.When you brought mouse cursor over the link , the browser will show you where the link goes.


browser showing same url for the link

Even you can try also when I keep muse over any link browser shows me that original link only.But now , when I click over the link it takes me to another link and then redirect me from that page.You can try by dragging the link and then re hovering on it. But how this is possible?You have ever thought about it that many affiliate links also does that.Many people hovers over an link or an image to get a idea about the normal and affiliate link.But they fails.


Now if you to want to do this , you're on the right place.But before that let's find out what is the mechanism behind it.

THE MARKUP : 1st way
There can be many ways to do it ,I mentioned here two.First way is to set onclick event in JavaScript.When this event is fired , the page goes to another page.


<a href="css-magz.blgspot.com" onclick="this.href='http://css-magz.blogspot.com/2017/04/show-user-different-location-and-send.html'">hey!Click here!</a>

The result is shown below-
hey!

You can also implement it on the images and that you already know.

Second Way
The noticeable thing in the above way is when the user directly drag and drop the link in the new browser window , your main link won't be work.And the solution fore that is here.

Here we are going to use onmousedown event.By using , our problem will solve.


<a id="myP" href="https://hmm.com" onmousedown="mouseDown()">
Click here!don't worry you'be not redirected to hmm.com
</a>

<script>
function mouseDown() {
    document.getElementById("myP").href = "https://css-magz.blogspot.com";
}
</script>

The above code will show normal URL to hmm.com but when drag or click it will change it to css-magz.blogspot.com. The result of above code is here.

Click here!don't worry you'be not redirected to hmm.com

Thanks for reading this article,make sure you have followed our blog.If not, follow now! it is completely free and takes no longer than 1 minute!

Monday 24 April 2017

Being in incognito or in private mode is actually private?

Many users thinks that being in incognito mode makes them anonymous in the web.But it really make you private?Let's find out.


Incognito mode

WHAT ACTUALLY HAPPENS?
Incognito mode ,Private browsing , In-private browsing - the names are very different but function is one and the same.When you are in the incognito mode , your browser doesn't store any history at all.In chrome it doesn't store any download record in its download section.

When you open up a Incognito window it works like a browser which cannot store history and cookies and local storage also.If so , the browser will immediately delete it.Private mode allows a person to browse the Web without storing local data that could be retrieved at a later date. Privacy mode will also disable the storage of data in cookies and Flash cookies.
opera private browsing .
Opera private mode

WHO CAN STILL SEE YOU

Well , you get the answer above , that being in incognito doesn't hide you any more. Actually nothing is private this days because your ISP and the web interpreters can still see what you are doing is.Let us look at what browsers are saying.


incognito mode in google chrome
incognito mode in chrome. 


Private browsing mode in Mozilla Firefox.

Incognito
 mode only prevents browser from saving your site visit activity. It won't stop other sources from seeing what sites you’ve visited, including:

  • 1.Your Internet service provider.
  • 2.Your employer (if you're using a work computer).
  • 3.The websites you visit themselves.
WHAT ARE THE THINGS THAT WON'T BE SAVED
Private or incognito browsing doesn't save the following things.-

Visited pages-Pages that are visited in the private mode won't be saved.That means no history is saved.(Bookmarks will saved)
Forms and search bar entries -The fiddled forms and the searches are won't come as suggestions next time.
Passwords-No passwords and usernames will be saved.
cookies or local storage-Cookies and local data will be saved and deleted as the browser window closed.That means if you are logged in to Facebook , and you closed the incognito window , you will be logged off and the next time you need to login again.
Downloaded items list -You can download as usual in private mode.Downloaded files will be saved but the list of downloaded items will not be saved.
Cached Web Content and Offline Web Content and User Data: Temporary Internet files or files that websites save for offline use will not be saved.

SOME THREATS WHILE BROWSING IN INCOGNITO
Private mode prevent browser from storing the history but the spam or the spywares can still monitor what you are doing on the web.Some powerful parenting control applications cannot save you from  hiding the history.Basically this doesn't happens if you don't have any spam type application installed on your computer.Some anti-viruses can still wrap around the browsers to find out viruses.They didn't matter whether you are in private mode or not.But they didn't save your web history.

USES OF THE INCOGNITO MODE
but still ,the Private mode has many uses.

1.Reduce history -If you are didn't searching any important things which's history you will not be needed later , you should use private browsing mode.This helps your browser to get reduced load of the web cache or the history.
2.Auto fills ,Personal information - If you don't want a name added in the username filled later as a  suggestion , use incognito mode.
3.Login multiple accounts-If you want to login your 2 gmail account at same time use incognito to to it.
4.Testing websites-If you are developing a web app and you want to test it,you need to refresh it multiple times. Incognito mode saves you from storing unnecessary history.

There can be more other uses like to preventing others to see your history if they are using your computer.

That's it is!
private browsing did you know

Please follow our FB page for more stuff!


Sunday 23 April 2017

Make a Image comparison slider

Whenever we have to compare two images , to show before and after images or to differentiates between two image filter we users image comparison slider.For example, If you want to differentiate between HD and SD quality of photos , you use image comparison slider.

Image slider showing green screen effects photos.

Now without talking much unnecessarily , let's take a jump into code.

CREATING MARKUP
This image slider can be a smallest slider code.As I have seen many of the libraries for image comparison from small to big.Some of they using Jquery , whereas some uses pure JavaScript.
Here I'm going to make this slider with pure JavaScript and the best thing is all the  JavaScript is fitted inside the HTML attribute.So you don't have to add JavaScript separately.


<div id="imgcomp">
<br>
<figure>
<div id="divider" style="width: 50%;">
</div>
</figure>
<input autocomplete="off" id="slider" max="100" min="0" oninput="var divider,slider;if(divider==null) divider=document.getElementById('divider');if(slider==null)slider=document.getElementById('slider');divider.style.width=slider.value+'%';" type="range" value="50">
</div>

First of all a division named imgcomp wrap all the slider.Inside that , first image will be inside another division named divider which will change its width when the <input type=" range" will changes its width.

WHERE TO PUT IMAGES?
Don't worry for now!we will add images in css.:) But before that have a look at the JavaScript.

FUNCTION HANDLING WITH JAVA-SCRIPT
You don't have to add separate JavaScript nor any library or Jquery as it is made with pure JavaScript. As can be seen , the code is inside the oninput attribute.The same code is given below just for reading.


var divider,slider;

if(divider==null) divider=document.getElementById('divider');

if(slider==null)
slider=document.getElementById('slider');

divider.style.width=slider.value+'%';

As can be written on the last line , Divider width is changed as slider changes its width.Slider changes its width when we drags it.

STYLING WITH CSS
Now let's see the css code required.Both the images are inserted as background images in this css. The image visible as the 'after' , or the main image you can set in div#imgcomp's background image.The image  will be sided , or the 'before' image that you have to set in the division inside figure element.

div#imgcomp {
width: 600vw;
height: 100vw;
max-width: 640px;
max-height: 360px;
overflow: hidden; }
div#imgcomp figure {
background-image: url(https://blogger.googleusercontent.com/img/b/R29vZ2xl/AVvXsEh3l3Dj5gJBuozmffxhVSOCPOEVfzoXyCuEoI-yfOcWm4tX3JDNaMT2NWJmfTI_JGvFkOM2Nhnkwb7d6uWsFcChyg5_MOsPETVOZJrfaluRVQRQgJcPFSOmmpyQfjR56wwNcuZQ3jsbiESW/s1600/Baahubali-after-vfx-effect-image.jpg);
background-size: cover;
position: relative;
font-size: 0;
width: 100%;
height: 100%;
margin: 0;
}
div#imgcomp figure > img {
position: relative;
width: 100%;
}
div#imgcomp figure div {
background-image: url(https://blogger.googleusercontent.com/img/b/R29vZ2xl/AVvXsEjuXXq9P-b1Lxu1uXFjzg02ip1HfXofVCDT88v8Xjuso1vsDN6xYZXjkNbuKoOIozEhRul032cZGmS5Rs9PUng4_RwXf6L40UoUYmmyiTVQgZxi6t2s0PD1Ft55wDYrfbXABqz4eFoJuhbE/s1600/Baahubali-before-vfx-effect-image.jpg);
background-size: cover;
position: absolute;
width: 50%;
box-shadow: 2px 0px white;
overflow: hidden;
bottom: 0;
height: 100%;
}

input[type=range]{
-webkit-appearance:none;
-moz-appearance:none;
position: relative;
top: -2rem; left: -1%;
background-color: rgba(255,255,255,0.1);
width: 102%;
}
input[type=range]:focus {
outline: none;
}
input[type=range]:active {
outline: none;
}

input[type=range]::-moz-range-track {
-moz-appearance:none;
height:20px;
width: 98%;
background-color: rgba(255,255,255,0.1);
position: relative;
outline: none;
}
input[type=range]::active {
border: none;
outline: none;
}
input[type=range]::-webkit-slider-thumb {
-webkit-appearance:none;
width: 20px; height: 20px;
background: white;
border-radius:0;
}
input[type=range]::-moz-range-thumb {
-moz-appearance: none;
width: 20px;
height: 20px;
background: white;
border-radius: 0;
}
input[type=range]:focus::-webkit-slider-thumb {
background: white;
}
input[type=range]:focus::-moz-range-thumb {
background: white;
}
Copy above code into your HTML's style tag.Change image url's.

Note that the both images should have same width and height.You can make changes in the css code the satisfy your needs

TIME FOR THE LIVE PREVIEW
As I have made a live preview here , but I have also made a Jsfiddle to get you to do experiment with the code.

LINK TO JSFIDDLE

CONCLUSION
As you can easily implement this slider tool to your website even on blog very quick.As the code is very little made with pure JavaScript , it loads very fast.If you have any queries to ask , please comment down below and keep following us on our Facebook page here.

Thursday 20 April 2017

Making a YouTube channel ad on your own blog or website free


Hey there!You are probably going to YouTube and there you see a rectangular ad on its homepage.This ad is created by YouTube but its quite interesting and give a focus to its viewers.You wish that if your channel ad of that type on your blog or website , will move your visitors to your YouTube channel an get more views.But this is coast money or not?Answer is absolutely no.You can do it for free and here I will show you how.

The ad is created by YouTube specially for its homepage.If you already have a well running blog and you're going to start a new YouTube channel and want to transfer your visitors to YouTube , this is a very good way to do it.

This is a little trick of a URL only.You have to make a iframe tag on your blog or website' HTML like below.


<iframe width="900" height="250" src="" frameborder="0" allowfullscreen></iframe>

But wait! We didn't added value of src attribute.Now what will be inside src that's the great thing.
Now let's get started!

1.1 PREPARING THE SRC 
I have given a little table below in which I have mentioned about some properties and their values.The main URL be like this-https://www.youtube.com/video_masthead? .After question mark ,all there will be the properties and their values both separated by '&'


Property
Value
Video_id
YouTube Video id
(You will get this after the YouTube URL.For eg.www.youtube.com/watch?v=Id)
TextLine1
Text that appear on the top.Any custom text or title.
Separated each word by + sign.For eg.My+first+video
autocrop
Video will be auto cropped in the wide screen. Possible values are 1 or 0.1 stands for true and 0 stands for false.
autoplay_start_time
The numerical value stands for the time for playing the video.Note that the video will auto play in mute mode unless user increase volume.1000 stands for 1second.
autoplay_duration
The numerical value stands for how many seconds the video should play.1000 stands for 1second.
video_wall
Possible value 0 or 1. 0 doesn’t show the other videos on your channel whereas 1 shows the other videos on your channel.
subscribe_button
Shows subscribe button and subscribers count after playing video.0 value for false and 1 for true.
Cta_label
Optional label to show at bottom after video ends.


Video is played for a particular time setted in autoplay_duration , and then minimises.Your profile and cover is visible there.

1.2 CREATING SRC
Make a src like this-
https://www.youtube.com/video_masthead?video_id=P3ksifJUgyY&textline1=subscribe+my+channel+on+youtube&autocrop=1&autoplay_duration=6000&subscribe_button=1

Above, I made a little URL. I inserted it in the iframe and made a JSfiddle. Feel free to hack the fiddle , trying more properties and changing values here.

1.3 SYNTAX FOR MAKING URL
If you didn't know how to make URL'S , I will show it here.Below it is a simple syntax of making url.

https://www.youtube.com/video_masthead?property=value&property=value

You can add many properties you want with their values.

1.4 MAKE A USE OF IT
Huh!?Now you know how to do this simple Ad widget.A live demo I'll be doing below.
Please keep sharing our articles & subscribe for more article updats.

Monday 17 April 2017

Top 5 CSS3 Animation makers Online

While doing CSS animations some developers face a little difficulty or designing CSS animations are quiet hard fore some.So,here is a great article telling you to how to make CSS animations online faster,easier and better then before!


CSS animation Makers

1.1 CSSANIMATE.COM
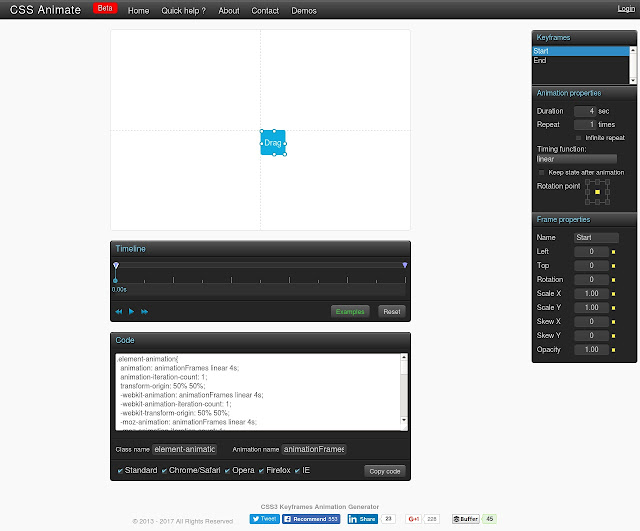
CSS animate is a tool for easy and fast creating CSS3 key-frames animation, right in your browser without using any desktop software.If you want to render complex and consistent CSS3 animation on your site this tool is made for you! You can create complex CSS3 keyframe animation without any coding and to get ready made css styles for using on your site.There are many examples you can direct implement on the object.

CSS Animate
1.2 ANGRY TOOLS
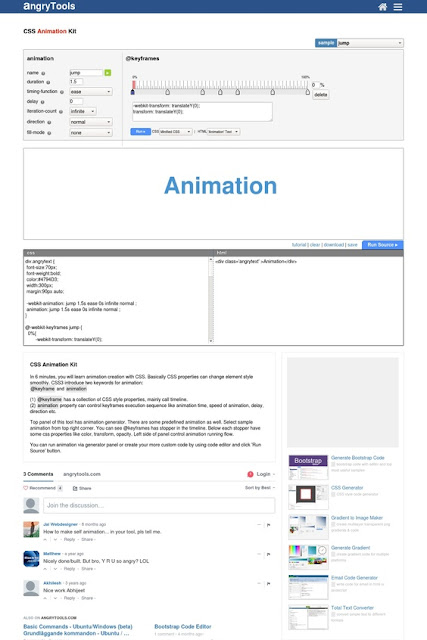
Angry tools is a website that provides you to use many tools.But here we now focusing on css animations,use above link to go there.This is a quite similar to CSS animate but here you can run your own source and test it.


Angry tools
1.3 THE APP GURUZ
The CSS animation is a little part of  the AppGuruz website.It is a very cool CSS animation generator and very easy to use. you can check each and every effect.If you like any one you can get its code and paste it to your website's CSS. You will probably love this site.


App Guruz
1.4 STYLIE


Stylie is a fun tool for easily creating complex web animations. Quickly design your animation graphically, grab the generated code and go!
Stylie is part of a larger, much more powerful tool called Mantra. In addition to Stylie's drag-and-drop tween editing, Mantra provides a timeline editing tool for tweaking animations at a more granular level. Since Stylie is built right in (press the T key in Mantra), you won't have to re-learn anything. It's a natural step if you want to take your animations to the next level!

Stilye

This is a very easy-to-use CSS generator.It gives you HTML and CSS code ,Preview  ,Resetting ability .etc This is hosted by Weebly. Many more tools you will found here.


CSS Animation Generator

Thanks for reading this article.Please subscribe our blog CSS_MAGZ. 

Sunday 16 April 2017

Turning On Your Blogger blogs Security : SSL

Hey there's!Today I'm going to show you how to turn on your blogs security,that means,turning your blog's address from HTTP://yourblog.blogspot.com to HTTPS://yourblog.blogspot.com.


HTTPS is a fundamental to internet security,enabling visitors to establish trust on security on your blog.It protects the integrity and confidentiality of exchange of the data between servers and client.The main motivation for HTTPS is authentication of the visited website and protection of the privacy and integrity of the exchanged data.Google came rolling out since September 2015 about lunching HTTPS support for blog-spot and finally that is came on May 2016.

WHAT DOES HTTPS DOES?
As said that HTTPS is a fundamental security above , it is a protocol for secure communication over a computer network which is widely used over internet.It makes secure connection between website and visitor's browser using encryption. HTTPS stands for Hyper text transfer protocol secure.
The HTTPS indicator in the Chrome browser

WHY YOUR BLOG NEEDS IT?
Before going to how to turn on your blogs security, first we see the advantages of setting up SSL certificate to your blog.Firstly it makes a secure connection.So your blog can be used for payment methods or for doing payment or login online securely.It enables trust and security on your blog for your visitors.Browser shows green lock icon at the side of URL box of the browser at a proper HTTPS severed over content.That means if your blog loads mixed content that is served over HTTP and HTTPS. For example,If you entered a image URL which is of a site which is served over HTTP ,Than that become mixed content, indicating that your site is not fully secure.And also, HTTPS is now considered as a ranking signal by google.

As usual,if you don't know about HTTPS or You didn't turn in on then your site is running on both HTTP and HTTPS. if you go to http://yourblog.blogspot.com , then you will not be seen green secure lock in the URL box f the browser.And if you go through https://yourblog.blogspot.com ,then you will be seen green colour lock in the URL box of the browser.

TURNING ON THE HTTPS REDIRECT OPTION
As you can see , this site is served over HTTPS. As if anyone goes to your blog by entering URL ,it will go in the normal page served over HTTP(if user don't mention https:// in URL bar).So if we turn on the HTTPS redirect option , your URL will auto redirect to HTTPS one and that means the secure one.

Now we see how to turn on this option.

1.Go to blogger.com and sign in to your account.
2.At right , in the options , click on settings.
3.Under basic section , you will get option of HTTPS redirect.
4.If it is turned 'NO' , then change it to 'YES'

The HTTPS Redirect setting in the BloggerThat's it is for now.We will come taking more and more articles for you on blogger,Helping you to make your blog better,Always.

Sunday 9 April 2017

Top 5 Websites to learn CSS online

CSS is a very important language in web development as it can design the html elements and make the website beautiful. CSS make a website awesome. learning CSS is a very essential if you learned HTML.

Now, if you are a beginner with HTML and want to learn CSS , here are top 5 websites to make your learning faster.So let's read this whole article and Take most out of it.

1.1 W3SCHOOLS
W3schools.com is a very excellent website for you to learn css. Even that, you can learn HTML ,JavaScript ,Jquery, PHP and Sql. With its simple UI and try it editor w3schools has gained a large popularity.It is also ranked high on google in Css and HTML tutorials.You can be sure that everything you read is up to standards since the site is maintained by the W3C, responsible for the web standards of today.

With its TryItEditor you can try every CSS example and also change it.You can even save the modified code.Versions of TryItEditing are upgrading so, in future more useful functions can come.

1.2 TUTORIALSPOINT
Tutorialspoint.com is a website to provide quality online education in the domains of omputer Science, Information Technology, Programming Languages, and other Engineering as well as Management subjects.On this website you will also get CSS tutorial.You can simply easy learn almost all languages including CSS.This website is also offers a pop up window in almost all the examples on CSS in which you can modify and test the code.

Tutorials point allows you to download the PDF of each tutorial if you want to learn offline.But yes,online learning makes you to clear doubts at that times on websites such as stackoverflow.

1.3 CODECADEMY
Articles are more in-depth explanations about concepts covered in Codecademy courses.Codecademy provides course for HTML & CSS which contains 7 hours of useful content for beginners.This website provides readings, examples, and an interactive window where you can practice coding.As we are talking about css here ,you can skip the HTML course if you know it already. 

You actually need to signup to get full access to content.But you can view substantial amount of content without doing so.

1.4 PHPFORKIDS
This website helps you a lot if you are a kid,I mean a absolute beginner.This website can take up you from HTML to PHP if you didn't know much about web development.There is no actually TryItEditor online.But you can try it practically on the computer or online with help of the websites like jsfiddle or codepan. This website offers you tests and quizzes on every tutorial.Quiz is very simple,is to just choose correct option from given four options.

One also special thing is on every page you will get only one Ad :p

1.5 Quackit
Well, there can be many-but this is last one of this article. Quackit is a website with very simple design and loosely font. Absolutely free and Has a try it editor for its examples.

If you are HTML beginner or if you have learned HTML then I suggest you to learn CSS.CSS is actually very easy language.Its syntax are very simple and easy to understood.
If your favorite site in which you have learned CSS is not listed here,then comment and tell us!

Make a cool swiping animation for your sub-domain title

Hello,friends.If you have already seen a collapsing tittle below in the demo at the very starting of this page,you  have been pleasantly wanting to do this type of title on your own website or blog.Now we are going to see that cool animation that you can use it as a title of your sub domains at a side of your logo.This is a short article giving you a direct CSS and HTML code.
So,first take a look at demo.

1.1 DEMO


Note:Please view the demo in Jsfiddle by clicking of above link.

1.2 HOW TO DO
This will finely work to you if your title is so big and can be collapsed in to short forms.For example,Facebook Developers.Facebook will collapsed into FB and developers will be come out behind that.
As seen in the demo ,there is android logo.Change with yours.Now feed your data into <span> and <h1>.Text inside <span> tag will remain as it is whereas, text inside <h1> tag will be collapse.

1.3 WHATS INSIDE THE CODE?
In this code,there has been made a pure use of CSS3 and HTML , using animation collapse.@Keyframes are simple.As they change width of <h1> tags.Overfow is made hidden as it will didn't show collapsed text.

1.4 WHATS NEXT?
I'm waiting for you to make a very better animation than this by modifying this fiddle, upgrade and comment me in comment section below.Good Bye and don't forget to check out my other articles!


Tuesday 4 April 2017

How To Get 000Webhost Premium Hosting For Free

You will be wondering after hearing that you can actually get a 000webhost hosting completely free! Now how to this?Read the whole article and know how!


Free web hosting


As all know nothing in this world is free , here also you need to do a little job for 000webhost. You have to first join their affiliate program and promote their links.After Only 3 referrals you can freely upgrade your free account into premium.

That's how you can upgrade your free account into premium.Now let us go into detailed steps.


1.1 SIGN UP FOR THE 000WEBHOST AFFILIATE


000webhost's affiliate is  a quite suitable for those who are looking for free premium hosting or there are already using 000webhost hosting or planning to do so. This affiliate only doesn't offer you to upgrade your free account, but also let give you a chance to earn money from $5 to $100 , even a free .com domain if you want.But it all depends upon your referrals.But here you need only 3 referrals to upgrade yours free account to premium.


000webhosting.com

000webhost affiliate is a cool tool for getting free premium account which coasts $3.49.So now lets get started....
Go to 000webhost affiliate and signup.Enter your name,email and password.Then you will be fastly signup!
If you don't have your 000webhost account already,you can do it here.


1.2 SHARING AFFILIATE LINKS


After all, you can share your links on your websites,make YouTube videos, comments on YouTube videos,use promotional texts,banners etc.It is very easy to share this links via Facebook account,Twitter,SMS or Email if you don't have any website or YouTube channel. 000webhost affiliate area provides you easy buttons for sharing your links vi Facebook , Twitter,Google+ and Reddit.Using banners is a best way if you have a website or blog.It looks like this.


Free web hosting


1.3 WHAT TO DO NEXT?


After sharing , you have to just wait for your minimum 3 referrals to upgrade your account.You can monitor your clicks,pending referrals,Active referrals,how much you earned and how much total paid.Once you gained 3 referrals, you are free to open your free premium hosting of 000webhost.


1.4 HOW I WILL BE PAID?


You will be paid via PayPal.If you don't have PayPal account yet,you can make it if you want to receive money from $5 to $100.By the way,there are more options for $10 , $40 , $90 and $200.But if you want to only upgrade your account ,you need not to do so.

1.5 ANY ALTERNATIVES?


 Yes! Hostinger is as same as 000webhost giving you the same things,if you want you can check out this also.

So that's how you can get your first 000webhost premium hosting for free.Thanks for reading this article.Do subscribe to our blog CSS-MAGZ.